Laravel Mail - Laravel 9 Send Email Tutorial Example
4 minutes read
You have build a web application sometimes you don't want go to your email web interface in purpose just to send notify or delivery your article posts or products to clients. It would better if we can integrated sending email from web application directly.
In Laravel Framework provide Mail class that allow to send email from web app. We are required only configuration and add a few settings to activate this feature.
This article will guide you how to send a email using SMTP and understand the concept of Laravel 9 Send Mail Using Gmail SMTP Server.
How to Send Mail in Laravel
Following the steps below to completed the task
- Step 1 - Install Laravel App
- Step 2 - Configuration SMTP
- Step 3 - Create Mailable Class
- Step 4 - Add View (Blade File)
- Step 5 - Create Controller
- Step 6 - Adding Route
- Step 7 - Run Laravel App
Step 1 - Install Laravel App
Suppose you have installed Laravel framework. Read this to know how to install Laravel project.
Step 2 - Configuration SMTP
We required an email come with credential information (email & password) and update those info to the .env file. You may face problem since Google Gmail has annouced turn off less secured app. Read detail for solve that problem
MAIL_DRIVER=smtp
MAIL_HOST=smtp.gmail.com
MAIL_PORT=587
MAIL_USERNAME=your_gmail@gmail.com
MAIL_PASSWORD=your_app_password
MAIL_ENCRYPTION=ssl
MAIL_FROM_ADDRESS="your_gmail@gmail.com"
MAIL_FROM_NAME="${APP_NAME}"
Step 3 - Create Mailable Class
We are going to create a mail class to send email out, so in this section we will run artisan command to generate a MailNotify class whihc is extend from mailable class.
php artisan make:mail MailNotify
After that it will generated a file and update below code.
Open file app -> Mail -> MailNotify.php
<?php

namespace App\Mail;

use Illuminate\Bus\Queueable;
use Illuminate\Contracts\Queue\ShouldQueue;
use Illuminate\Mail\Mailable;
use Illuminate\Queue\SerializesModels;

class MailNotify extends Mailable
{
    use Queueable, SerializesModels;

    public $data=[];

    /**
     * Create a new message instance.
     *
     * @return void
     */
    public function __construct($data)
    {
        $this->data= $data;
    }

    /**
     * Build the message.
     *
     * @return $this
     */
    public function build()
    {
        return $this->from('example@cambotutorial.com', 'Cambo Tutorial')
        ->subject($this->data["subject"])
                    ->view('emails.subscribe')->with("data",$this->data);
    }
}
This step we will pass data throug constructor class, so that we can pass those data in blade file by with("data",$this->data)
Step 4 - Add View (Blade File)
We have pass data to blade file in MailNotify class, but we are not create the view file yet. Now let's create blade view file under directory emails
Create file resources -> views -> emails -> subscribe.blade.php
<!DOCTYPE html>
<html>
<head>
<title>Cambo Tutorial</title>
</head>
<body>
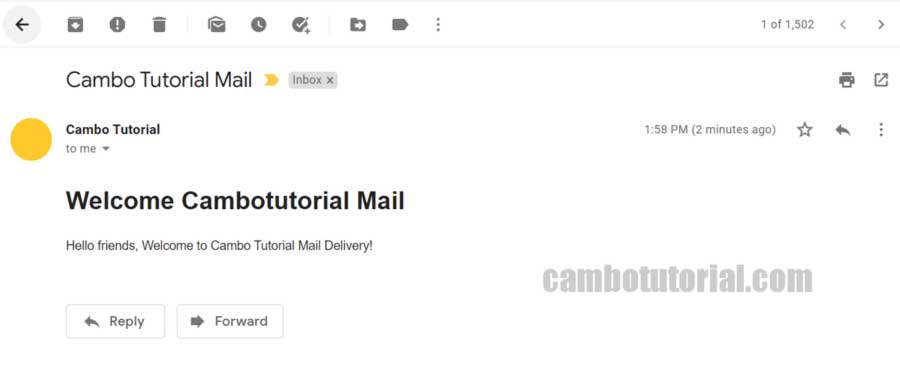
<h1>Welcome Cambotutorial Mail</h1>
<p>{{ $data['body'] }}</p>
</body>
</html>
Step 5 - Create Controller
Now we are going to create controller named MailController. With index() function where we write code for sending email and pass data to Mailable class which is we have created at moment. Following command to create controller and update code below.
php artisan make:controller MailController
Open file app -> Http -> Controllers -> MailController.php
<?php

namespace App\Http\Controllers;

use Illuminate\Http\Request;
use Mail;
use App\Mail\MailNotify;

class MailController extends Controller
{

  public function index()
  {
    $data = [
      "subject"=>"Cambo Tutorial Mail",
      "body"=>"Hello friends, Welcome to Cambo Tutorial Mail Delivery!"
      ];
    // MailNotify class that is extend from Mailable class.
    try
    {
      Mail::to('receiver@example.com')->send(new MailNotify($data));
      return response()->json(['Great! Successfully send in your mail']);
    }
    catch(Exception $e)
    {
      return response()->json(['Sorry! Please try again latter']);
    }
  }
}
Step 6 - Adding Route
In Laravel application, Route is a file that contain instruction where URL is point to which Controller and function to run and pass to where blade file.
Open file routes -> web.php
<?php

use Illuminate\Support\Facades\Route;

use App\Http\Controllers\MailController;

/*
|--------------------------------------------------------------------------
| Web Routes
|--------------------------------------------------------------------------
|
| Here is where you can register web routes for your application. These
| routes are loaded by the RouteServiceProvider within a group which
| contains the "web" middleware group. Now create something great!
|
*/

Route::get('/sendmail', [MailController::class, 'index']);
Step 7 - Run Laravel App
Finally, we ready to run artisan command. We are going start the Laravel server with following command.
php artisan serve
Go to URL http://localhost:8000/sendmail will perform sending to your email.
Hope it would help have a nice day.
You might Also Like:
- Laravel Estimate Article Reading in Minutes
- Laravel 9 Resize Thumbnail Image
- How to Upload File in Laravel 9
- Laravel 9 Generate Report Save as PDF
Laravel PHP Laravel 9 Laravel Mail

Author
As the founder and passionate educator behind this platform, I’m dedicated to sharing practical knowledge in programming to help you grow. Whether you’re a beginner exploring Machine Learning, PHP, Laravel, Python, Java, or Android Development, you’ll find tutorials here that are simple, accessible, and easy to understand. My mission is to make learning enjoyable and effective for everyone. Dive in, start learning, and don’t forget to follow along for more tips and insights!. Follow him
Search
Tags
Popular Articles
-
Laravel 9 Login Multiple Roles using Custom Middleware
17.46K -
Drag Drop File Upload with Dropzone.js in Laravel 8, Laravel 9
14.96K -
Laravel Mail - Laravel 9 Send Email Tutorial Example
12.97K -
How to Generate Dummy Data in Laravel 9
3.41K -
How to Install Laravel 9 PHP Framework
3.04K -
How to Upload File in Laravel 9 with Example
3K