Laravel 9 Resize Thumbnail Image Before Upload
5 minutes read
Today you will learn about Laravel 9 image resize example, I will explain how to resize an image in Laravel before upload to server. We will use the intervention/image composer package. The package Laravel intervention have many function to handle with image such as image resize, crop, rotate, compress, blur the image Laravel. but for this article I will show you how to upload image by form after that image will resize display as image preview.

So without further ado let's follow the below steps to resize a thumbnail image and upload to the server with Laravel Framework.
How to Resize Image Before Upload
The following step to complete resize thumbnail phto.
- Step 1 - Install Laravel App
- Step 2 - Install Package
- Step 3 - Create Controller
- Step 4 - Config Symlink to Link Storage File
- Step 5 - Create Blade View
- Step 6 - Adding Route
- Step 7 - Run Laravel App
Step 1 - Install Laravel App
You have to installed Laravel framework. Read this to know how to install Laravel project.
Step 2 - Install Package
Now we will install intervention/image package, so we can use some function to resize image. Following command to install package.
composer require intervention/image
Step 3 - Create Controller
This step we will create new controller named ImageController , so first run bellow command
php artisan make:controller ImageController
After that the command will create a file. We will add two methods one is for display UI, other one is for upload and resize the image for thumbnail, so place code to resize the image as below
Open file app -> Http -> Controllers -> ImageController.blade.php
<?php

namespace App\Http\Controllers;

use Illuminate\Http\Request;
use Image;
use File;
class ImageController extends Controller
{
    public function showUploadUI()
    {
    	return view('uploadUI');
    }

    public function uploadResize(Request $request)
    {
        $path = public_path('/thumbnail/');
        $request->validate([
            'image' => 'required|image|mimes:jpeg,png,jpg,gif,svg|max:2048',
        ]);
        $file = $request->file('image');

        // Create directory if not exist
        if(!File::isDirectory($path))
        {
            File::makeDirectory($path, 0777, true, true);
        }

        // Rename by date and time
        $finalName= date("Y_m_d_h_i_sa", date(time())).".".$file->getClientOriginalExtension();

        // Resize image to thumbnail
        $img = Image::make($file->path());
        $img->resize(200, 200, function ($constraint) {
            $constraint->aspectRatio();
        })->save($path.$finalName);
        $file->storeAs("/public/images/", $finalName);
        return back()
            ->with('success','File has been uploaded.')
            ->with('image',$finalName);
    }
}
Step 4 - Config Symlink to Link Storage File
We upload and store files in storage directory. We have to link public -> uploads -> images directory in root with storage directory which located in storage -> app -> public -> images. I have written an article about how symlink in hosting and local machine.
Open file config -> filesystems.php
Change
'links' => [
        public_path('public') => storage_path('app/public'),
    ],
To
'links' => [
        public_path('uploads') => storage_path('app/public'),
    ],
After modified filesystems.php run command artisan below
php artisan storage:link
Step 5 - Create Blade File (View)
Now we have to create a view to display how web UI to upload and resize the image. We are going to set a button and image display after we have resized. Create a file and named as below.
Open file resources -> views -> uploadUI.blade.php
<html>
<head>
<title>Laravel 9 Image Resize - cambotutorial.com</title>
<link href="https://cdnjs.cloudflare.com/ajax/libs/bootstrap/5.1.3/css/bootstrap.min.css" rel="stylesheet">
</head>
<body>
<div class="container">
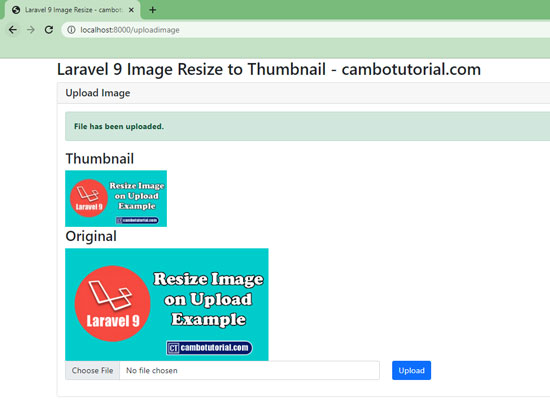
<h2>Laravel 9 Image Resize to Thumbnail - cambotutorial.com</h2>
<div class="card">
<h5 class="card-header">Upload Image</h5>
<div class="card-body">
@if ($message = Session::get('success'))
<div class="alert alert-success" role="alert">
<strong>{{ $message }}</strong>
</div>
<h3>Thumbnail</h3>
<img src="{{asset('thumbnail')}}/{{ Session::get('image') }}">
<h3>Original</h3>
<img src="{{asset('uploads/images')}}/{{ Session::get('image') }}" width="400px">
@endif
@if (count($errors) > 0)
<div class="alert alert-danger">
<ul>
@foreach ($errors->all() as $error)
<li>{{ $error }}</li>
@endforeach
</ul>
</div>
@endif
<form action="{{ route('uploadImg') }}" method="POST" enctype="multipart/form-data">
@csrf
<div class="row"> <br>
<div class="col-md-6">
<input type="file" name="image" class="form-control">
</div>
<div class="col-md-6">
<button type="submit" class="btn btn-primary">Upload</button>
</div>
</div>
</form>
</div>
</div>
</div>
</body>
</html>
Step 6 - Adding Route
To activate view web UI to correct URL with controller we have to insert the URL in route. We have two different methods but the same URL to apply. See the below route.
Open file routes -> web.php
<?php

use Illuminate\Support\Facades\Route;

use App\Http\Controllers\ImageController;


/*
|--------------------------------------------------------------------------
| Web Routes
|--------------------------------------------------------------------------
|
| Here is where you can register web routes for your application. These
| routes are loaded by the RouteServiceProvider within a group which
| contains the "web" middleware group. Now create something great!
|
*/

Route::get('/uploadimage', [ImageController::class, 'showUploadUI'])->name("uploadUI");
Route::post('/uploadimage', [ImageController::class, 'uploadResize'])->name("uploadResize");
Step 7 - Run Laravel App
Finally, we ready to run artisan command. We are going start the Laravel server with following command.
php artisan serve
Then we will see first home page laravel project via http://localhost:8000/uploadimage
Hope you can install successfully and run Laravel project. Thanks
Laravel PHP Laravel 9
Author
As the founder and passionate educator behind this platform, I’m dedicated to sharing practical knowledge in programming to help you grow. Whether you’re a beginner exploring Machine Learning, PHP, Laravel, Python, Java, or Android Development, you’ll find tutorials here that are simple, accessible, and easy to understand. My mission is to make learning enjoyable and effective for everyone. Dive in, start learning, and don’t forget to follow along for more tips and insights!. Follow him
Search
Tags
Popular Articles
-
Laravel 9 Login Multiple Roles using Custom Middleware
17.31K -
Drag Drop File Upload with Dropzone.js in Laravel 8, Laravel 9
14.76K -
Laravel Mail - Laravel 9 Send Email Tutorial Example
12.79K -
How to Generate Dummy Data in Laravel 9
3.33K -
How to Install Laravel 9 PHP Framework
2.93K -
How to Upload File in Laravel 9 with Example
2.9K