Laravel 9 Login Multiple Roles using Custom Middleware
10 minutes read
Laravel 9 Multiple Roles using Custom Middleware; in Laravel middleware will filter all http requests when there is client making request, for example we can find out which request is unauthorized and need to redirect to login page or to register page. The main purpose is to filter out unwanted request which is mostly apply to role and permission user.
The below example I show from scratch of implementation middleware. I also have wrote article to implement CRUD with Paging from scratch so the beginner will understand what's is view model controller and route.
In this example, I will show three roles of users as below:
- User
- Editor
- Admin
When you login have role editor will redirect to dashboard editor, if you login as admin will redirect to admin page and so on.
Laravel 9 Middleware Example
The following steps help you to create and use middleware in Laravel 9 with PHP 8
- Step 1 - Install Laravel
- Step 2 - Update Model & Migration
- Step 3 - Create Auth using Scaffold
- Step 4 - Create Middleware
- Step 5 - Register Middleware
- Step 6 - Add Logic in Middleware File
- Step 7 - Adding Route
- Step 8 - Add Method in Controller
- Step 9 - Create View (Blade)
- Step 10 - Update Login Controller
- Step 11 - Add Seeder Testing
- Step 12 - Run Laravel Server
Step 1 - Install Laravel
First of all, we have to download Laravel Project and configure database connection in .env file. You might check how to install and configure database for Laravel 9.
Step 2 - Update Model & Migration
By default in Laravel already have migration file user, and we will add a field to user table and model to identified user role. We add field "role" to migration file below
Update Migration File
Open file database -> migrations -> 2014_10_12_000000_create_users_table.php
<?php

use Illuminate\Database\Migrations\Migration;
use Illuminate\Database\Schema\Blueprint;
use Illuminate\Support\Facades\Schema;

return new class extends Migration
{
    /**
     * Run the migrations.
     *
     * @return void
     */
    public function up()
    {
        Schema::create('users', function (Blueprint $table) {
            $table->id();
            $table->string('name');
            $table->string('email')->unique();
            $table->timestamp('email_verified_at')->nullable();
            $table->string('password');
            //0 = User, 1 = Editor, 2 = Admin
            $table->tinyInteger('role')->default(0);
            $table->rememberToken();
            $table->timestamps();
        });
    }

    /**
     * Reverse the migrations.
     *
     * @return void
     */
    public function down()
    {
        Schema::dropIfExists('users');
    }
};
Now we are going to run command below to create table in database
php artisan migrate
Update Model File
Then we have to update model class to match table fields
Open file app -> Models -> User.php
<?php

namespace App\Models;

use Illuminate\Contracts\Auth\MustVerifyEmail;
use Illuminate\Database\Eloquent\Factories\HasFactory;
use Illuminate\Foundation\Auth\User as Authenticatable;
use Illuminate\Notifications\Notifiable;
use Laravel\Sanctum\HasApiTokens;
use Illuminate\Database\Eloquent\Casts\Attribute;

class User extends Authenticatable
{
    use HasApiTokens, HasFactory, Notifiable;

    /**
     * The attributes that are mass assignable.
     *
     * @var array

     */
    protected $fillable = [
        'name',
        'email',
        'password',
        'role'
    ];

    /**
     * The attributes that should be hidden for serialization.
     *
     * @var array

     */
    protected $hidden = [
        'password',
        'remember_token',
    ];

    /**
     * The attributes that should be cast.
     *
     * @var array

     */
    protected $casts = [
        'email_verified_at' => 'datetime',
    ];

    /**
     * @param  integer  $value
     * @return \Illuminate\Database\Eloquent\Casts\Attribute
     */
    protected function role(): Attribute
    {
        return new Attribute(
            get: fn ($value) =>  ["user", "editor", "admin"][$value],
        );
    }
}
Make sure you have to import use Illuminate\Database\Eloquent\Casts\Attribute; unless your role will return as number not text role.
In case you use lower PHP version attribute should change as below
public function getRoleAttribute($value)
{
    return ["user", "editor", "admin"][$value];
}
Step 3 - Create Auth using Scaffold
Now, we will execute following command to create auth scaffold which are login, register and dashboard page.
Install Laravel UI:
composer require laravel/ui
Add Auth Bootstrap UI Scaffold:
php artisan ui bootstrap --auth
To able run command npm you have to install node.js, in my case I use version v17.4.0, the command will compile css and javascript for layout authentication page. By default Laravel 9 will use vite plugin I will install Laravel mix instead
Open file package.json you may update following object to install laravel mix
"scripts": {
     "dev": "npm run development",
     "development": "mix"
},
Then command in terminal
npm install laravel-mix@latest --save-dev

npm install

npm run dev
Step 4 - Create Middleware
Firstly, we have to create middleware file to implement the logic. Let's open the terminal or command prompt in Laravel root directory and execute following command:
php artisan make:middleware UserRoleMiddleware
The command will generate a file under directory App -> Http -> Middleware -> UserRoleMiddleware.php
Step 5 - Register Middleware
Now we have to register and create aliase name user-role in Kernel.php file. Aliase name will use in Route.php as well.
Open file app -> Http -> Kernel.php
<?php
namespace App\Http;
use Illuminate\Foundation\Http\Kernel as HttpKernel;
class Kernel extends HttpKernel
{
    ....
    /**
     * The application's route middleware.
     *
     * These middleware may be assigned to groups or used individually.
     *
     * @var array
     */
    protected $routeMiddleware = [
        'auth' => \App\Http\Middleware\Authenticate::class,
        ....
        'user-role' => \App\Http\Middleware\UserRoleMiddleware::class,
    ];
}
Step 6 - Add Logic in Middleware File
We have to add new parameter $role to validate role requested from Route.php we can see this in next step. But now we will implement if the role is match will allow to the next request, otherwise will return no permission in JSON format.
Open file App -> Http -> Middleware -> UserRoleMiddleware;
<?php
namespace App\Http\Middleware;
use Closure;
use Illuminate\Http\Request;
use Auth;

class UserRoleMiddleware
{
    /**
     * Handle an incoming request.
     *
     * @param  \Illuminate\Http\Request  $request
     * @param  \Closure  $next
     * @param  \Integer  role
     * @return mixed
     */

    // Add custom parameter $role which pass from Route.php
    public function handle(Request $request, Closure $next, $role)
    {
        // Check & verify with route, you will more understand
        if(Auth::check() && Auth::user()->role == $role)
        {
            return $next($request);
        }

        return response()->json(['You do not have permission to access for this page.']);
    }
}
Step 7 - Add Route
In this step, we will add route as group where we have different user roles. The request will looking to matching role and allow entry to each role page. Let's see following code below:
Open file routes -> web.php
<?php

use Illuminate\Support\Facades\Route;
use App\Http\Controllers\HomeController;

/*
|--------------------------------------------------------------------------
| Web Routes
|--------------------------------------------------------------------------
|
| Here is where you can register web routes for your application. These
| routes are loaded by the RouteServiceProvider within a group which
| contains the "web" middleware group. Now create something great!
|
*/

Route::get('/', function () {
    return view('welcome');
});

Auth::routes();
// Route User
Route::middleware(['auth','user-role:user'])->group(function()
{
    Route::get("/home",[HomeController::class, 'userHome'])->name("home");
});
// Route Editor
Route::middleware(['auth','user-role:editor'])->group(function()
{
    Route::get("/editor/home",[HomeController::class, 'editorHome'])->name("editor.home");
});
// Route Admin
Route::middleware(['auth','user-role:admin'])->group(function()
{
    Route::get("/admin/home",[HomeController::class, 'adminHome'])->name("admin.home");
});
Each group route we have add two middlewares are auth and user-role. I have called middleware aliase name user-role separated by role with colon, so all routes in each group must match each role as well.
Step 8 - Add Method in Controller
In this step, we are going to use default controller and add method userHome(), editorHome(), and adminHome()
Open file app -> Http -> Controllers -> HomeController.php
<?php
namespace App\Http\Controllers;
use Illuminate\Http\Request;
class HomeController extends Controller
{
/**
* Create a new controller instance.
*
* @return void
*/
public function __construct()
{
}
/**
* Show the application dashboard.
*
* @return \Illuminate\Contracts\Support\Renderable
*/
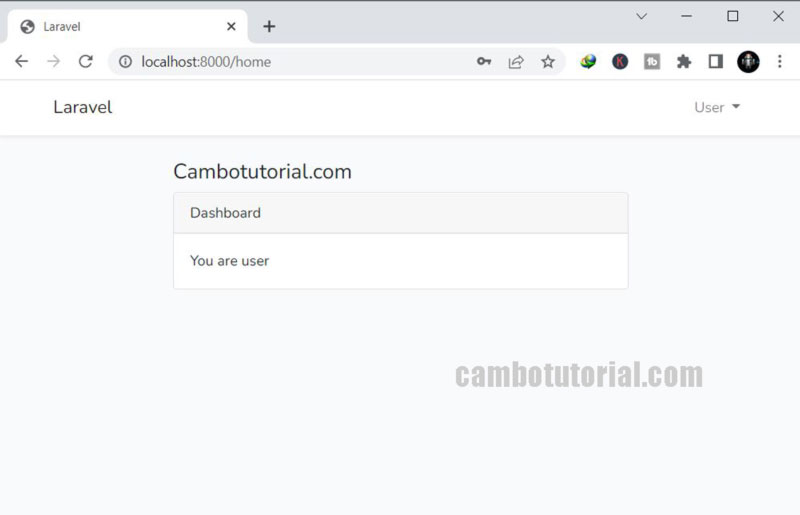
public function userHome()
{
return view('home',["msg"=>"Hello! I am user"]);
}
/**
* Show the application dashboard.
*
* @return \Illuminate\Contracts\Support\Renderable
*/
public function editorHome()
{
return view('home',["msg"=>"Hello! I am editor"]);
}
/**
* Show the application dashboard.
*
* @return \Illuminate\Contracts\Support\Renderable
*/
public function adminHome()
{
return view('home',["msg"=>"Hello! I am admin"]);
}
}
Step 9 - Create View (Blade)
In this step, we are going to create new blade files for each user role.
Create file resources -> views -> home.blade.php
@extends('layouts.app')

@section('content')
<div class="container">
    <div class="row justify-content-center">
        <div class="col-md-8">
            <h4>Cambotutorial.com</h4>
            <div class="card">
                <div class="card-header">{{ __('Dashboard') }}</div>

                <div class="card-body">
                    @if (session('status'))
                        <div class="alert alert-success" role="alert">
                            {{ session('status') }}
                        </div>
                    @endif
                    {{ Auth::user()->name }}
                    <br>
                    {{$msg}}
                </div>
            </div>
        </div>
    </div>
</div>
@endsection
Step 10 - Update Login Controller
In login controller we will update a few lines of code to redirect to the correct page base on their login role. So let's modified:
Open file app -> Http -> Controllers -> Auth -> LoginController.php
<?php

namespace App\Http\Controllers\Auth;

use App\Http\Controllers\Controller;
use App\Providers\RouteServiceProvider;
use Illuminate\Foundation\Auth\AuthenticatesUsers;
use Illuminate\Http\Request;

class LoginController extends Controller
{
    /*
    |--------------------------------------------------------------------------
    | Login Controller
    |--------------------------------------------------------------------------
    |
    | This controller handles authenticating users for the application and
    | redirecting them to your home screen. The controller uses a trait
    | to conveniently provide its functionality to your applications.
    |
    */

    use AuthenticatesUsers;

    /**
     * Where to redirect users after login.
     *
     * @var string
     */
    protected $redirectTo = RouteServiceProvider::HOME;

    /**
     * Create a new controller instance.
     *
     * @return void
     */
    public function __construct()
    {
        $this->middleware('guest')->except('logout');
    }

    public function login(Request $request)
    {
        $input = $request->all();

        $this->validate($request, [
            'email' => 'required|email',
            'password' => 'required',
        ]);

        if(auth()->attempt(array('email' => $input['email'], 'password' => $input['password'])))
        {
            if (auth()->user()->role == 'admin')
            {
              return redirect()->route('admin.home');
            }
            else if (auth()->user()->role == 'editor')
            {
              return redirect()->route('editor.home');
            }
            else
            {
              return redirect()->route('home');
            }
        }
        else
        {
            return redirect()
            ->route('login')
            ->with('error','Incorrect email or password!.');
        }
    }
}
Step 12 - Add Seeder Testing
For testing data we will create seeder for each role user login. Using following command will create a file seeder.
php artisan make:seeder CreateUserSeeder
Open file Database -> Seeders -> CreateUserSeeder.php
<?php

namespace Database\Seeders;

use Illuminate\Database\Console\Seeds\WithoutModelEvents;
use Illuminate\Database\Seeder;
use App\Models\User;

class CreateUserSeeder extends Seeder
{
    /**
     * Run the database seeds.
     *
     * @return void
     */
    public function run()
    {
        $users = [
            [
               'name'=>'User',
               'email'=>'user@cambotutorial.com',
               'role'=> 0,
               'password'=> bcrypt('123456'),
            ],
            [
               'name'=>'Editor',
               'email'=>'editor@cambotutorial.com',
               'role'=> 1,
               'password'=> bcrypt('123456'),
            ],
            [
               'name'=>'Admin',
               'email'=>'admin@cambotutorial.com',
               'role'=> 2,
               'password'=> bcrypt('123456'),
            ],

        ];

        foreach ($users as $key => $user)
        {
            User::create($user);
        }
    }
}
Now following command to generate 3 users with different roles:
php artisan db:seed --class=CreateUserSeeder
Step 11 - Run Laravel Server
Finally we are waiting this step for testing the result. Run following command to run Laravel server
php artisan serve
Open the browser with URL http://localhost:8000/login and enter each role credential for testing.
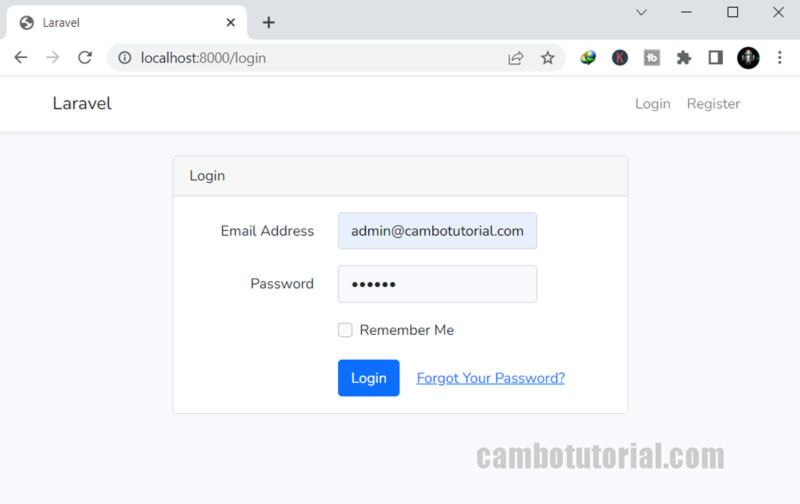
Normal User
Email: user@cambotutorial.com
Password: 123456
Editor User
Email: editor@cambotutorial.com
Password: 123456

Admin User
Email: admin@cambotutorial.com
Password: 123456

Hope this tutorial will help you to how to create custom middleware with different roles, if you have doubt something leave comment below I will assist you. Have a nice day!
You might Also Like:
Laravel PHP Laravel 9 Laravel Middleware

Author
As the founder and passionate educator behind this platform, I’m dedicated to sharing practical knowledge in programming to help you grow. Whether you’re a beginner exploring Machine Learning, PHP, Laravel, Python, Java, or Android Development, you’ll find tutorials here that are simple, accessible, and easy to understand. My mission is to make learning enjoyable and effective for everyone. Dive in, start learning, and don’t forget to follow along for more tips and insights!. Follow him
Search
Tags
Popular Articles
-
Laravel 9 Login Multiple Roles using Custom Middleware
17.38K -
Drag Drop File Upload with Dropzone.js in Laravel 8, Laravel 9
14.87K -
Laravel Mail - Laravel 9 Send Email Tutorial Example
12.88K -
How to Generate Dummy Data in Laravel 9
3.38K -
How to Install Laravel 9 PHP Framework
2.99K -
How to Upload File in Laravel 9 with Example
2.95K