Laravel Create URL Slug for SEO Optimize
5 minutes read
Today, I will take a short part to demo how we can customize find a record from integer to slug URL look neat and help boost SEO optimization. Generally, you build a website and manipulate a record is to find record by the id. In this tutorial we will generated unique slug from title article.
What is URL Slugs?
Slug in term use in website is the component of a URL that identifies a specific page on a website. URL slug improve ranking your website in search engine results pages (SERPs) and also user friendly URL. Below I will tell you where is slug in the URL.
Example:
https://www.cambotutorial.com/article/laravel-create-url-slug-for-seo-optimize
Last part of above URL(laravel-create-url-slug-for-seo-optimize) is a slug which you can predict what content will describe from the URL. I am not going to detail about how SEO related to the slug. You may find many articles over internet are talking about.
How to Generate URL Slugs
- Step 1 - Install Laravel 9 & Setup Database
- Step 2 - Create Model & Migration
- Step 3 - Create Class Slug
- Step 4 - Create Controller
- Step 5 - Adding Route
- Step 6 - Create View (Blade File)
- Step 7 - Run Laravel App
Step 1 - Install Laravel 9 & Setup Database
You have to installed Laravel framework. Read this to know how to install Laravel project with database.
Step 2 - Create Model & Migration
Create Model
Follwing command artisan to generate a migration file and a model class, you may use the --migration or -m option to create migrate file.
php artisan make:model Article -m
Open file app -> models -> article.php
<?php

namespace App\Models;

use Illuminate\Database\Eloquent\Factories\HasFactory;
use Illuminate\Database\Eloquent\Model;

class Article extends Model
{
    use HasFactory;

    protected $fillable = [
        'title', 'slug', 'body'
    ];
}
Update Migration
Open file database -> migrations -> 2022_06_11_023112_create_articles_table.php
<?php

use Illuminate\Database\Migrations\Migration;
use Illuminate\Database\Schema\Blueprint;
use Illuminate\Support\Facades\Schema;

return new class extends Migration
{
    /**
     * Run the migrations.
     *
     * @return void
     */
    public function up()
    {
        Schema::create('articles', function (Blueprint $table) {
            $table->id();
            $table->string('title');
            $table->string('slug')->unique();
            $table->text('body');
            $table->timestamps();
        });
    }

    /**
     * Reverse the migrations.
     *
     * @return void
     */
    public function down()
    {
        Schema::dropIfExists('articles');
    }
};
Hope you have updated database connection confidential in .env file correctly then run below command to create table in database.
php artisan migrate
Step 3 - Create Class Slug
We are going to create a Class called Slug to handle and how to generate slug within this class only.
Create file app -> Models -> Slug.php
<?php

namespace App\Models;
use Illuminate\Support\Str;

class Slug
{
  private $title;
  public function __construct($title)
  {
    $this->title = $title;
  }
  public function createSlug()
  {
    // Convert title to slug
    $slug = Str::slug($this->title);

    // Get all related slug
    $slugs = $this->getRelatedSlugs($slug);

    if (! $slugs->contains('slug', $slug)) return $slug;

    // Add number as suffix
    for ($i = 1; $i <= 20; $i++)
    {
        $newSlug = $slug.'-'.$i;
        if (! $slugs->contains('slug', $newSlug)) return $newSlug;
    }
    throw new \Exception('Can not create a unique slug');
  }

  private function getRelatedSlugs($slug)
  {
      return Article::select('slug')
          ->where('slug', 'like', $slug.'%')
          ->get();
  }
}
Step 4 - Create Controller
This step we are going to create a controller named ArticleController and implementing two methods. Try following command to create controller and update code below.
php artisan make:controller ArticleController
Open file app -> Http -> Controllers -> ArticleController.php
<?php

namespace App\Http\Controllers;

use Illuminate\Http\Request;
use App\Models\Article;
use App\Models\Slug;

class ArticleController extends Controller
{
  // Render page for input title
  public function index()
  {
    return view("index");
  }

  public function store(Request $request)
  {
      $request->validate([
          'title' => 'required',
          'body' => 'required'
          ]);
      $article = new Article;
      $article->title = $request->title;
      $article->body = $request->body;

      // check and create slug
      $slug = new Slug($article->title);
      $article->slug = $slug->createSlug();
      $article->save();
      return redirect()->route('index')
        ->with('success','Record created successfully.');

  }
}
Step 5 - Adding Route
We will add route to web.php to tell where controller and method point to correct URL.
Open file routes -> web.php
<?php

use Illuminate\Support\Facades\Route;
use App\Http\Controllers\ArticleController;

/*
|--------------------------------------------------------------------------
| Web Routes
|--------------------------------------------------------------------------
|
| Here is where you can register web routes for your application. These
| routes are loaded by the RouteServiceProvider within a group which
| contains the "web" middleware group. Now create something great!
|
*/
Route::get('/', [ArticleController::class, 'index'])->name('index');
Route::post('/store', [ArticleController::class, 'store'])->name('store');
Step 6 - Create View (Blade File)
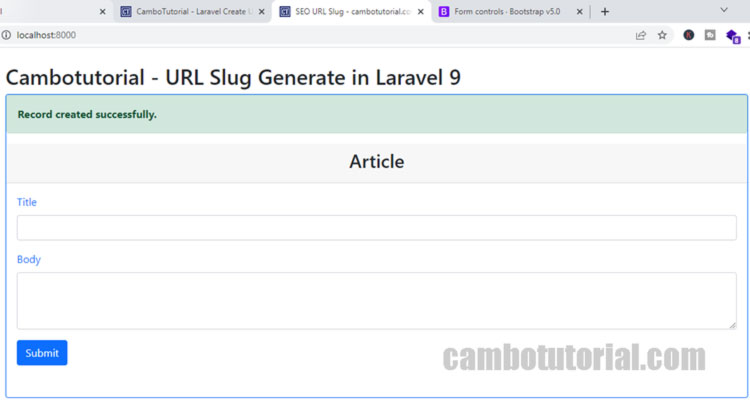
Now we will implement very simple HTML form to input some text and title.
Create file resources -> views -> index.blade.php
<!DOCTYPE html>
<html>

<head>
    <meta charset="utf-8">
    <title>SEO URL Slug - cambotutorial.com</title>
    <link href="https://cdn.jsdelivr.net/npm/bootstrap@5.0.2/dist/css/bootstrap.min.css" rel="stylesheet"/>
</head>
<body>
    <div class="container mt-4">
        <h2>Cambotutorial - URL Slug Generate in Laravel 9</h2>
        <div class="row align-items-center">
            <div class="col">
                <div class="card border-primary mb-4">
                    @if ($message = Session::get('success'))
                    <div class="alert alert-success" role="alert">
                        <strong>{{ $message }}</strong>
                    </div>
                    @endif
                    <div class="card-header"><h3 class="text-center">Article</h3></div>
                        <div class="card-body text-primary">
                        <form action="{{ route('store') }}" method="POST">
                            @csrf
                            <div class="mb-3">
                                <label class="form-label">Title</label>
                                <input type="text" class="form-control" name="title">
                            </div>
                            <div class="mb-3">
                                <label class="form-label">Body</label>
                                <textarea class="form-control" name="body" rows="3"></textarea>
                            </div>
                            <div class="mb-3">
                                <button type="submit" class="btn btn-primary mb-3">Submit</button>
                            </div>
                        </form>
                        </div>
                </div>
            </div>
        </div>
    </div>
</body>
</html>
Step 7 - Run Laravel App
Finally, we will run Laravel server by command artisan below:
php artisan serve
To see the webpage for input form open browser with URL http://localhost:8000/ and try to filled in the text and submit the same text mutiple time.
Go and check your database
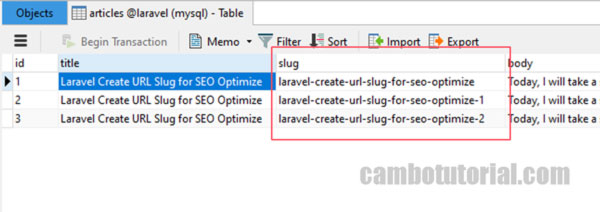
That's all for today. Hope this tutorial help you to completed your project. Thanks for reading :)
Laravel PHP Laravel 9
Author
As the founder and passionate educator behind this platform, I’m dedicated to sharing practical knowledge in programming to help you grow. Whether you’re a beginner exploring Machine Learning, PHP, Laravel, Python, Java, or Android Development, you’ll find tutorials here that are simple, accessible, and easy to understand. My mission is to make learning enjoyable and effective for everyone. Dive in, start learning, and don’t forget to follow along for more tips and insights!. Follow him
Search
Tags
Popular Articles
-
Laravel 9 Login Multiple Roles using Custom Middleware
17.32K -
Drag Drop File Upload with Dropzone.js in Laravel 8, Laravel 9
14.77K -
Laravel Mail - Laravel 9 Send Email Tutorial Example
12.8K -
How to Generate Dummy Data in Laravel 9
3.33K -
How to Install Laravel 9 PHP Framework
2.94K -
How to Upload File in Laravel 9 with Example
2.9K