Laravel 9 Ajax Image Upload in Database
6 minutes read
We will explain detail in Laravel 9 using Ajax to upload image and preview on webpage before upload. You will learn upload image using Ajax in Laravel 9 with validation. We will try to find simple example to show how to using Ajax Jquery upload image in Laravel by following instruction below.

Using Ajax Upload Image in Laravel 9
In this example, we are going to create a table to store name of image after we uploaded. We will design a form with input file and button then after submit image via Jquery Ajax to store in server directory and database.
- Step 1 - Installing Laravel App
- Step 2 - Create Model and Migration
- Step 3 - Create Controller
- Step 4 - Symlink Storage
- Step 5 - Adding Route
- Step 6 - Create Upload Form (Blade File)
- Step 7 - Run Laravel App
Step 1 - Install Laravel
You have to installed Laravel framework. Read this to know how to install Laravel project with database.
Step 2 - Create Model and Migration
We are going create a table named "photo" to store all image name, so firstly we create a Model. To generate migration at the same time generate the model, you may use the --migration or -m option
php artisan make:model Photo -m
Update Migration
Open file database -> migrations -> 2022_06_21_033722_create_photos_table.php
<?php

use Illuminate\Database\Migrations\Migration;
use Illuminate\Database\Schema\Blueprint;
use Illuminate\Support\Facades\Schema;

return new class extends Migration
{
    /**
     * Run the migrations.
     *
     * @return void
     */
    public function up()
    {
        Schema::create('photos', function (Blueprint $table) {
            $table->id();
            $table->string('filename');
            $table->timestamps();
        });
    }

    /**
     * Reverse the migrations.
     *
     * @return void
     */
    public function down()
    {
        Schema::dropIfExists('photos');
    }
};
After that make sure you have change database connection in .env file accordingly. Open command prompt and run the following command to create tables in database
php artisan migrate
Step 3 - Create Controller
We are going to create a controller to display the UI and perform upload image to server with specific directory. Let's run command as below to generate controller file.
php artisan make:controller PhotoController
Let's update the following code to Controller File.
Open file app -> Http -> Controllers -> PhotoController.blade.php
<?php

namespace App\Http\Controllers;

use Illuminate\Http\Request;
use App\Models\Photo;

class PhotoController extends Controller
{
    public function showUploadUI()
    {
    	return view('uploadAjax');
    }

    public function uploadImage(Request $request)
    {
        $validate = Validator::make($request->post(), ["photo"=>"image|mimes:jpeg,png,jpg|max:1024'"]);
        $json=[];
        if($validate->fails())
        {
            $json["msg"] = "failed to upload!";
        }
        else
        {
            $file = $request->file('photo');
            $finalName= date("Y_m_d_h_i_sa", date(time())).".".$file->getClientOriginalExtension();

            //Store location in storage/app/public/images/file.png
            $file->storeAs('/public/images/', $finalName);

            // Instance object and save in database
            $photo = new Photo();
            $photo->filename = $finalName;
            $photo->save();

            $json["msg"] = 'Image uploaded successfully';
        }

        return response()->json($json);
    }
}
Step 4 - Configure Symlink to Link Storage File
When we use storeAs() the files will store in storage directory which located in storage/app/public/ and we have to link to public/uploads/images directory in root, so that we can access files publicly. I have written an article about how symlink in hosting and local machine you might want to read which will face problem in hosting.
Open file config -> filesystems.php
Scroll down find below and change
'links' => [
        public_path('public') => storage_path('app/public'),
    ],
To
'links' => [
        public_path('uploads') => storage_path('app/public'),
    ],
After modified filesystems.php run command artisan below
php artisan storage:link
Step 5 - Adding Route
Next we will route link to the file blade and controller to manage GET and POST requests for render view.
Open file routes -> web.php
<?php

use Illuminate\Support\Facades\Route;
use App\Http\Controllers\PhotoController;

/*
|--------------------------------------------------------------------------
| Web Routes
|--------------------------------------------------------------------------
|
| Here is where you can register web routes for your application. These
| routes are loaded by the RouteServiceProvider within a group which
| contains the "web" middleware group. Now create something great!
|
*/
Route::get('/uploadajax', [PhotoController::class, 'showUploadUI'])->name("uploadAjaxUI");
Route::post('/uploadajax', [PhotoController::class, 'uploadImage'])->name("uploadAjax");
Step 6 - Create Upload Form (Blade File)
We are going to create a view file, the web UI that allows to upload file. We will design simple form with an input type file and a button to click upload and perform some Jquery script to preview image.
$('input[type=file]').change(function(){

    let reader = new FileReader();
    reader.onload = (e) => {
        $('#preview-image').attr('src', e.target.result);
    }
    reader.readAsDataURL(this.files[0]);

});
We will have input file after we browse the file in local disk then preview the file in img attribute before upload which have id "preview-image". See below full snippet code.
Open file resources -> views -> uploadAjax.blade.php
<html>
<head>
    <title>Laravel 9 Ajax Upload Image - cambotutorial.com</title>
    <link href="https://cdnjs.cloudflare.com/ajax/libs/bootstrap/5.1.3/css/bootstrap.min.css" rel="stylesheet">
</head>
<body>
    <div class="container">
        <h2>Laravel 9 Ajax Upload Image - cambotutorial.com</h2>
        <div class="card">
            <h5 class="card-header">Upload Image</h5>
            <div class="card-body">
                <img id="preview-image" src="" style="max-height: 250px;">
                <form>
                    <div class="row">
                        <div class="col-md-6">
                            <input type="file" name="image" class="form-control">
                        </div>
                        <div class="col-md-6">
                            <button type="button" id="btn" class="btn btn-primary">Upload</button>
                        </div>
                    </div>
                </form>
            </div>
        </div>
    </div>
</body>
<script src="https://cdnjs.cloudflare.com/ajax/libs/jquery/3.6.0/jquery.min.js"></script>
<script>
$("#btn").on("click",()=>
{
    var data1=new FormData();
    data1.append("photo",$("input[type=file]")[0].files[0]);
    data1.append("_token","{{ csrf_token() }}");
    $.ajax({
        type:'POST',
        url: "{{ url('uploadajax')}}",
        data: data1,
        cache:false,
        contentType: false,
        processData: false,
        success: (data) =>
        {
            alert(data["msg"]);
        },
        error: function(data){
            console.log(data);
        }
    });
});
$('input[type=file]').change(function(){

    let reader = new FileReader();
    reader.onload = (e) => {
        $('#preview-image').attr('src', e.target.result);
    }
    reader.readAsDataURL(this.files[0]);

});
</script>
</html>
Step 7 - Run Laravel App
Final step is to start development server by following command
php artisan serve
After server run then open your browser and hit the following url to see the web page http://localhost:8000/uploadajax
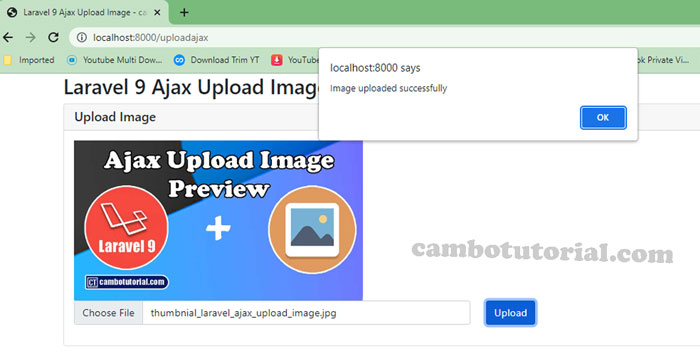
Thanks for read upload image using Ajax article, hope it would help your project. Have a nice day!
You might Also Like:
JQuery Laravel PHP Ajax Laravel 9

Author
As the founder and passionate educator behind this platform, I’m dedicated to sharing practical knowledge in programming to help you grow. Whether you’re a beginner exploring Machine Learning, PHP, Laravel, Python, Java, or Android Development, you’ll find tutorials here that are simple, accessible, and easy to understand. My mission is to make learning enjoyable and effective for everyone. Dive in, start learning, and don’t forget to follow along for more tips and insights!. Follow him
Search
Tags
Popular Articles
-
Laravel 9 Ajax Image Upload in Database
1.82K -
Remove Record no Reload Page using Ajax in Laravel
1.69K -
Autocomplete Search Ajax Typeahead from Database in Laravel
1.41K -
JQuery, Cheerio- The way to get text without other elements wrap or outside tag
1.25K -
Javascript-Jquery How to use ajax to upload file from browser
1.01K