Laravel 9 Add Google reCaptcha v2 Example
5 minutes read
Laravel 9 Add Google reCaptcha v2 Example; this article will help you to implement reCaptcha v2 in Laravel 9. reCaptcha can avoid your site from spam and abuse which help your site more secure. Today we will start from scratch reCaptcha implement in Laravel rule which help validating before submit data to server, so that for beginner will easily understand.
What is Google reCaptcha?
Google reCaptcha is a service from Google that help defends websites from automate bots. The reCaptcha allow the clients (users, or bot) solve simple puzzle but it quite hard for "bots" and other malicious software automated. This is means you can block bot spam or automated software to submit data on your website.
How to Add Google reCaptcha v2 Example
These following steps to implemented Google reCaptcha.
- Step 1 - Register & Get reCaptcha Keys
- Step 2 - Install Laravel Project
- Step 3 - Create Validation Rule
- Step 4 - Create Controller
- Step 5 - Create View (Blade)
- Step 6 - Add Routes
- Step 7 - Run Laravel Server
Step 1 - Register & Get reCaptcha Keys
Since we are going to use Google reCaptcha, we have to register website to get the APIs keys. If you do not have keys, you may visit Google reCAPTCHA to create an app and keying in the form.

Choose reCAPTCHA v2 and select "I'm not a robot" Checkbox. Then after click submit button will show another panel form consist confidential keys. The keys are important when we use for validating submit form.

- Site Key - key insert in HTML code for client side (Public Key)
- Secret Key - key for validate between your site and the reCAPTCHA server (Private Key).
Now we have the keys, we will add key in Laravel after installed the project.
Step 2 - Install Laravel Project
For installation and configure database you can read this, I have wrote an article. In this example we are not required database connection.
We are going to add keys in .env file which easy to maintain later on.
G_RECAPTCHA_KEY=YOUR_KEY
G_RECAPTCHA_SECRET=YOUR_SECRET_KEY
Step 3 - Create Validation Rule
Next step, we will create a validation rule for handle user solve puzzle by Google reCaptcha correct or not. Following command to create a rule file
php artisan make:rule GreCaptcha
Open file app -> Rules -> GreCaptcha.php
<?php

namespace App\Rules;

use Illuminate\Contracts\Validation\Rule;
use GuzzleHttp\Client;

class GreCaptcha implements Rule
{
    /**
     * Create a new rule instance.
     *
     * @return void
     */
    public function __construct()
    {
        //
    }

    /**
     * Determine if the validation rule passes.
     *
     * @param  string  $attribute
     * @param  mixed  $value
     * @return bool
     */
    public function passes($attribute, $value)
    {
        $client = new Client(['verify' => false]);
        $response = $client->get("https://www.google.com/recaptcha/api/siteverify",
        [
            'query' =>[
                'secret' => env('G_RECAPTCHA_SECRET'),
                'response' => $value
            ]
        ]);
        $body = json_decode($response->getBody());
        return  $body->success;
    }

    /**
     * Get the validation error message.
     *
     * @return string
     */
    public function message()
    {
        return 'The validation error message.';
    }
}
Step 4 - Create Controller
We create controller to received request from client and check with validation rule. Run command to generated controller.
php artisan make:controller ContactController
Open file app -> Http -> Controllers -> ContactController.php
<?php

namespace App\Http\Controllers;

use Illuminate\Http\Request;
use App\Rules\GreCaptcha;

class ContactController extends Controller
{
    public function index()
    {
      return view('index');
    }

    public function store(Request $request)
    {
       $request->validate([
            'email' => 'required|email',
            'message' => 'required',
            'g-recaptcha-response' => ['required', new GreCaptcha]
       ],
       [ 'g-recaptcha-response.required' => 'reCaptcha field is required.']);

        return redirect()->route("index")->with(["success"=>"reCaptcha solve"]);
    }
}
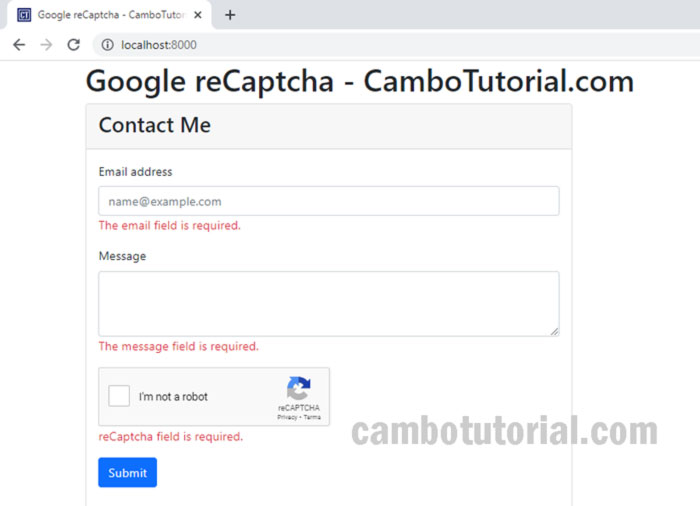
Step 5 - Create View (Blade)
We are going to create a blade file to design very simple input as contact form. We will insert reCaptcha element with public key which we set in .env file.
Create file resources -> views -> index.blade.php
<!DOCTYPE html>
<html>
<head>
    <meta charset="utf-8">
    <title>Validation Google reCaptcha - CamboTutorial.com</title>
    <link href="https://cdn.jsdelivr.net/npm/bootstrap@5.0.2/dist/css/bootstrap.min.css" rel="stylesheet">
</head>
<body>

<div class="container">
    <h1>Google reCaptcha - CamboTutorial.com</h1>
    <div class="card">
        <div class="card-header">
        <h3>Contact Me</h3>
        </div>
        <div class="card-body">
            @if(Session::has('success'))
              <div class="alert alert-success">
        	    {{ Session::get('success') }}
               </div>
           @endif
            <form method="POST" action="{{ route('store') }}">
                @csrf
                <div class="mb-3">
                    <label class="form-label">Email address</label>
                    <input type="email" class="form-control" name="email" placeholder="name@example.com">
                    @error('email')
                    <span class="text-danger">{{ $errors->first('email') }}</span>
                    @enderror
                </div>
                <div class="mb-3">
                    <label class="form-label">Message</label>
                    <textarea class="form-control" name="message" rows="3"></textarea>
                    @error('message')
                       <span class="text-danger">{{ $errors->first('message') }}</span>
                    @enderror
                </div>
                <div class="mb-3">
                    <div class=" g-recaptcha" data-sitekey="{{ env('G_RECAPTCHA_KEY') }}"></div>
                    @error('g-recaptcha-response')
					   <span class="text-danger">{{ $errors->first('g-recaptcha-response') }}</span>
				    @enderror
                </div>
                <div class="mb-3">
                    <button type="submit" class="btn btn-primary mb-3">Submit</button>
                </div>
            </form>
        </div>
    </div>
</div>
<script src="https://www.google.com/recaptcha/api.js"></script>
</body>
</html>
Step 6 - Add Routes
Add the following code to web.php to tell Laravel where URL should point to controller.
Open file routes -> web.php
<?php

use App\Http\Controllers\ContactController;


Route::get('/', [ContactController ::class, 'index']);
Route::post('/store', [ContactController ::class, 'store']);
Step 7 - Run Laravel Server
Final step to run Laravel app by following command. Now we can test and launch the app via browser URL http://localhost:8000/
php artisan serve
Hope this tutorial help you to implement Google reCaptcha v2 and completed your project. Thanks for reading :)
You might Also Like:
- Laravel 9 Login Multiple Roles using Custom Middleware
- Laravel 9 Resize Thumbnail Image
- How to Upload File in Laravel 9
- How to Generate Dummy Data in Laravel 9
Laravel PHP Laravel 9

Author
As the founder and passionate educator behind this platform, I’m dedicated to sharing practical knowledge in programming to help you grow. Whether you’re a beginner exploring Machine Learning, PHP, Laravel, Python, Java, or Android Development, you’ll find tutorials here that are simple, accessible, and easy to understand. My mission is to make learning enjoyable and effective for everyone. Dive in, start learning, and don’t forget to follow along for more tips and insights!. Follow him
Search
Tags
Popular Articles
-
Laravel 9 Login Multiple Roles using Custom Middleware
17.46K -
Drag Drop File Upload with Dropzone.js in Laravel 8, Laravel 9
14.96K -
Laravel Mail - Laravel 9 Send Email Tutorial Example
12.97K -
How to Generate Dummy Data in Laravel 9
3.41K -
How to Install Laravel 9 PHP Framework
3.04K -
How to Upload File in Laravel 9 with Example
3K