Razorpay Payment Gateway Integration in Laravel Tutorial
6 minutes read
Laravel 9 Integrate Razorpay Payment Gateway Example; in this tutorial you will learn how to integrate Razorpay payment gateway with simple example. We will go through step by step about Razorpay integration payment in Laravel app using with front-end JavaScript library of the Razorpay payment gateway for Indian payment online.
Razorpay support alot of options to access all payment modes including credit card, debit card, netbanking, UPI and popular wallets including JioMoney, Mobikwik, Airtel Money, FreeCharge, Ola Money and PayZapp.
You have to create a Razorpay account and get the app secret key from the Razorpay app, before integrating the Razorpay payment gateway into the Laravel 9. You can access this link to create a Razorpay app
Razorpay Payment Gateway Integration
I have tested on Laravel 9 and PHP 8. Following step below to help you integrate Razor payment online:
- Step 1 - Register & Get Razorpay Keys
- Step 2 - Install Laravel
- Step 3 - Install Razorpay Package
- Step 4 - Adding Route
- Step 5 - Create Controller
- Step 6 - Create View (Blade File)
- Step 7 - Run Laravel Server
Step 1 - Register & Get Razorpay Keys
Go to www.razorpay.com to create an account on Razorpay and you will get account key id and key secret. After register done you may go to https://dashboard.razorpay.com/app/keys to get the keys.
Step 2 - Install Laravel
To install and download Laravel project is very easy you can read this, I have wrote an article. In this example we are not required database connection.
After we got keys, we are going to add keys in .env file in root directory. Replace with you own key.
RAZORPAY_KEY=rzp_test_Ed2Dwb9FnMxAqV
RAZORPAY_SECRET=XXXXXXXXXXXXXXXX
Step 3 - Install Razorpay Package
This step required you to install the razorpay/razorpay package in order to use the Razorpay API. Now, let's run the following command.
composer require razorpay/razorpay:2.*
Step 4 - Adding Route
Next, let's add route, the route we need two routes link; one is for showing form and other one is for send data action route. Let's open the following file.
Open file routes -> web.php
use Illuminate\Support\Facades\Route;

use App\Http\Controllers\RazorpayController;

/*
|--------------------------------------------------------------------------
| Web Routes
|--------------------------------------------------------------------------
|
| Here is where you can register web routes for your application. These
| routes are loaded by the RouteServiceProvider within a group which
| contains the "web" middleware group. Now create something great!
|
*/

Route::get('razorpayment', [RazorpayController::class, 'index']);
Route::post('razorpayment', [RazorpayController::class, 'store'])->name('pay');
Step 5 - Create Controller
In this step, we will create a controller and write payment logic for payment and show form payment, now we are going to generate controller file as following command:
php artisan make:controller RazorpayController
Open file app -> Http -> Controllers -> RazorpayController.php
<?php

namespace App\Http\Controllers;

use Illuminate\Http\Request;
use Razorpay\Api\Api;
use Exception;

class RazorpayController extends Controller
{
    private $data = [];
    public function index()
    {
        // sample data for test
        $this->data = collect([
            [
                'title'=>'WORLD WEAR FOOTWEAR',
                'description' => 'The Footwear That Suits Your Personality.',
                'amount' => 1500,
                'old'=>1800,
                'img' => 'https://m.media-amazon.com/images/I/71D9ImsvEtL._UY500_.jpg',
                'id'=>1
            ],
            [
                'title'=>'Bourge Men Loire-z1 ',
                'description' => 'Allow your pair of shoes to air ',
                'amount' => 500,
                'old'=>1800,
                'img' => 'https://m.media-amazon.com/images/I/81e3bMcCeGL._UL1500_.jpg',
                'id'=>2
            ],
            [
                'title'=>'Bourge Mens Loire-z-503',
                'description' => 'Cushioned, Lightweigh, Breathable, Soft',
                'amount' => 699,
                'old'=>900,
                'img' => 'https://m.media-amazon.com/images/I/71M5hkz4GcL._UY695_.jpg',
                'id'=>3
            ]
        ]);

        return view('index',['data'=>$data]);
    }

    public function store(Request $request)
    {
        $input = $request->all();

        $api = new Api(env('RAZORPAY_KEY'), env('RAZORPAY_SECRET'));
        /* You have to calculate or made logic in server if possible,
         to prevent inject cheat on front-end */
        $product = $this->data->firstWhere("id",$input['pro_id']);
        $payment = $api->payment->fetch($input['pay_id']);

        if(!empty($input['pay_id']))
        {
            try
            {
                $response = $api->payment->fetch($input['pay_id'])->capture(array('amount'=>$product['amount']));
                //store to database

                return response()->json(["success"=>"Transaction completed"]);
            }
            catch (Exception $e)
            {
                return response()->json(["error"=>$e->getMessage()]);
            }
        }
        return response()->json(["error"=>"invalid payment id"]);
    }
}
Step 6 - Create View (Blade File)
We need to create a blade file to show the form payment. Let's create index.blade.php file and update code:
<!DOCTYPE html>
<html lang="en">
   <head>
      <meta charset="UTF-8">
      <meta http-equiv="X-UA-Compatible" content="IE=edge">
      <meta name="viewport" content="width=device-width, initial-scale=1.0">
      <title>Document</title>
   </head>
   <link href="https://cdn.jsdelivr.net/npm/bootstrap@5.0.2/dist/css/bootstrap.min.css" rel="stylesheet">
   <body>
      <div class="py-4">
         <div class="container">
            <h3 class="text-center">Razor Payment - CamboTutorial.com</h3>
            <div class="row">
            @foreach($data as $product)
               <div class="col-md-4">
                  <div class="card">
                     <img class="card-img-top" height="320"  src="{{ $product['img'] }}">
                     <div class="card-body">
                        <h5 class="card-title">{{ $product['title'] }}</h5>
                        <p class="card-text">{{ $product['description'] }}</p>
                     </div>
                     <div class="card-footer">
                        <button onclick="order(this)" class="btn btn-sm btn-primary" data-amount="{{ $product['amount'] }}" data-id="{{ $product['id'] }}">Order Now</button>
                        <span class="float-end">
                            <b style="font-size:24px">₹{{ $product['amount'] }}</b>
                            <b><del>₹{{ $product['old'] }}</del></b>
                        </span>
                     </div>
                  </div>
               </div>
            @endforeach
            </div>
         </div>
      </div>
   </body>
   <script src="http://ajax.googleapis.com/ajax/libs/jquery/1.9.1/jquery.js"></script>
   <script src="https://checkout.razorpay.com/v1/checkout.js"></script>
   <script>
    function order(ele)
    {
        var totalAmount = $(ele).attr("data-amount");
        var product_id =  $(ele).attr("data-id");
        var options = {
            "key": "rzp_test_Ed2Dwb9FnMxAqV",
            "amount": (totalAmount*100), // 2000 paise = INR 20
            "name": "CamboTutorial",
            "description": "Nice shoes to buy",
            "image": "https://favicon-generator.org/favicon-generator/htdocs/favicons/2021-09-30/f17cc9516d16866c6964926746781e23.ico.png",
            "handler": function (response)
            {
                console.log(response);
                //ajax response.razorpay_payment_id
                $.ajax({
                    url:{{route('pay')}},
                    method:'post',
                    data:{
                        'pro_id': product_id,
                        'pay_id': response.razorpay_payment_id,
                        '_token': "{{ csrf_token() }}"
                    },
                    success:function(res)
                    {
                        console.log(res);
                    }
                })
            },
            "prefill": {
                "contact": '9978546963',
                "email":   'pay.me@cambotutorial.com',
                },
            "theme": {"color": "#08a9a4"}
        };
        var rzp1 = new Razorpay(options);
        rzp1.open();
    }
    </script>
</html>
Step 7 - Run Laravel Server
Now we are going to test the application so run command below to start the server
php artisan serve
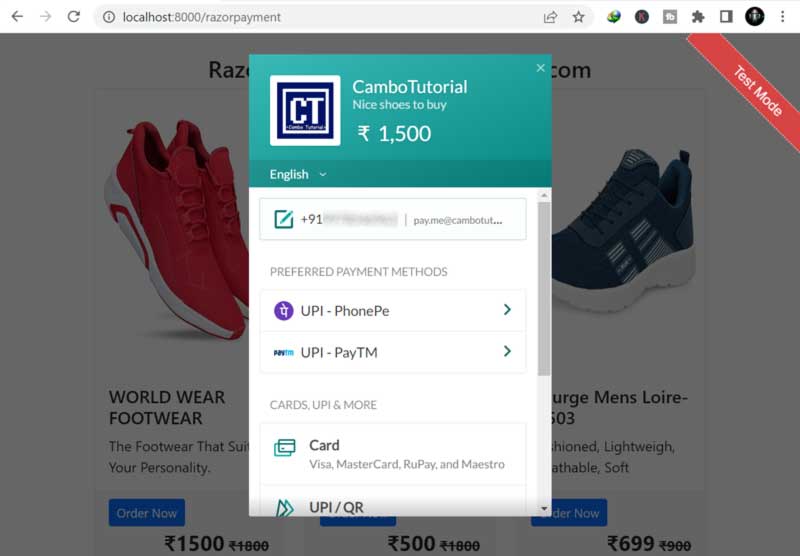
Open your prefered browser and access to URL http://localhost:8000/ to products sample and click button order to launch payment.
Below are sample data testing or you check this link to see more testing card.
Master Card : 5267 3181 8797 5449
CVV : Random CVV
Expiry Date : Any future date
You might Also Like:

Author
As the founder and passionate educator behind this platform, I’m dedicated to sharing practical knowledge in programming to help you grow. Whether you’re a beginner exploring Machine Learning, PHP, Laravel, Python, Java, or Android Development, you’ll find tutorials here that are simple, accessible, and easy to understand. My mission is to make learning enjoyable and effective for everyone. Dive in, start learning, and don’t forget to follow along for more tips and insights!. Follow him
Search
Tags
Popular Articles
-
Laravel 9 Login Multiple Roles using Custom Middleware
17.46K -
Drag Drop File Upload with Dropzone.js in Laravel 8, Laravel 9
14.96K -
Laravel Mail - Laravel 9 Send Email Tutorial Example
12.97K -
How to Generate Dummy Data in Laravel 9
3.41K -
How to Install Laravel 9 PHP Framework
3.04K -
How to Upload File in Laravel 9 with Example
3K